Spring Time: Fiddlehead Ferns

IMG_2189.jpg

Watching springtime roll into the Delaware Valley is truly a sight for tired winter eyes. Pale greens, pinks, purples, and florescent yellow litter the rolling hills of Bucks County. One of my favorite evolutions in the landscape is the budding heads of the whimsical ostrich fern, better known as fiddlehead ferns. These curled little nuggets of peppery sweet goodness are immense in my parents neck of the woods. For the past two weeks I have been religiously checking the usual locations of these magnificent spring treats, coming up with nothing but more and more anticipation.

IMG_2183.jpg

This past week brought in a spastic weather change and a soon following downpour. I knew fiddles were on their way. Today I wandered into the woods and lo and behold my beauties were awaiting me! I scrambled, filled my pockets and ran home. I diced up some shallots, garlic and butter, add a touch of white wine, and I tasted spring for the first time this year.

IMG_2185.JPG

If you live in the Philadelphia area, you can probably find some ostrich ferns in your local woods. Look for clusters of reddish brown peels with bright green spirals of green. I often find them in loose and wet soil, in shady areas. If you're a newb to foraging, please please please, don't go pulling random ferns out of the ground if your not sure what an ostrich looks like. Do some research and you should be able to spot the little guys. If you are not the foraging type, you can sometimes find fiddleheads at speciality stores. Expect to pay a premium, but it is oh so totally worth it.

photo 3.jpg

Sautéed Wild Fiddlehead Ferns

3 tablespoon butter

2 shallots, diced

1 clove garlic, minced

3 cups well washed fiddleheads

Splash dry white wine

Salt & Pepper to taste

In a pan melt down butter, add shallot, cook till translucent, add garlic. ​Add fiddleheads and wine, and cook for 3 minutes. Enjoy your taste of the season! 

DIY: Fresh Pasta

photo (11).JPG

There are few things that still intimidate me in the kitchen. The longer it takes, the more challenging and old world it is, the more I love it. However fresh pasta is something I have never mustered up the courage to make. The image of a disappointed Italian Grandma always haunts me when I contemplate the process. Pasta has always seemed daunting, easy to fail, and not worth it (considering you can buy the dried stuff for under $2 ) and who wants to disappoint my imaginary Italian Grandma anyway?

ROLL.jpg

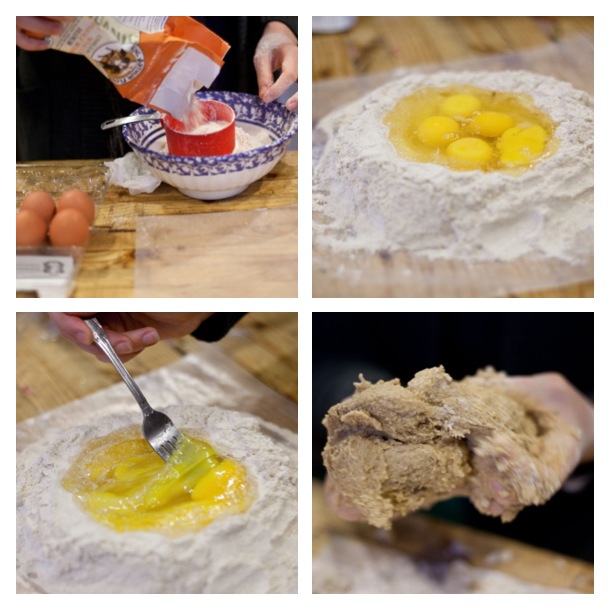
Last week I  worked up the courage with the help of the wonderful Carina of Molto Carina, a fresh pasta pro. I finally had my supportive, beautiful and oddly young 'Italian grandma' at my side, to hold my hand through the process, to tell me "it's suppose to look like that", as I skeptically whisked my egg into my well, the older, harder way of making fresh pasta dough.

burrito.jpg

Lets be real. Fresh pasta is in fact incredibly labor intensive, though there are some modern shortcuts. From mixing the dough, to rolling it out, to drying, the process took about 2 hours, though time flied by as Carina and I talked of our early years in College, and the ridiculous shenanigans we fell into. The hour it took me to get a smooth dough was the most trying, as the dough needs to be throughly kneaded, which I did all by hand. I thought the sticky wad of flour and eggs in my hands would never turn into a proper dough, but lo and behold it had. Grandma would be proud, and Carina approved. We finally rolled out the dough and decided to make pappardelle pasta, a favorite of my not so Italian father, which seemed only right since he had made the rolling pin I was using.

drying rack.jpg

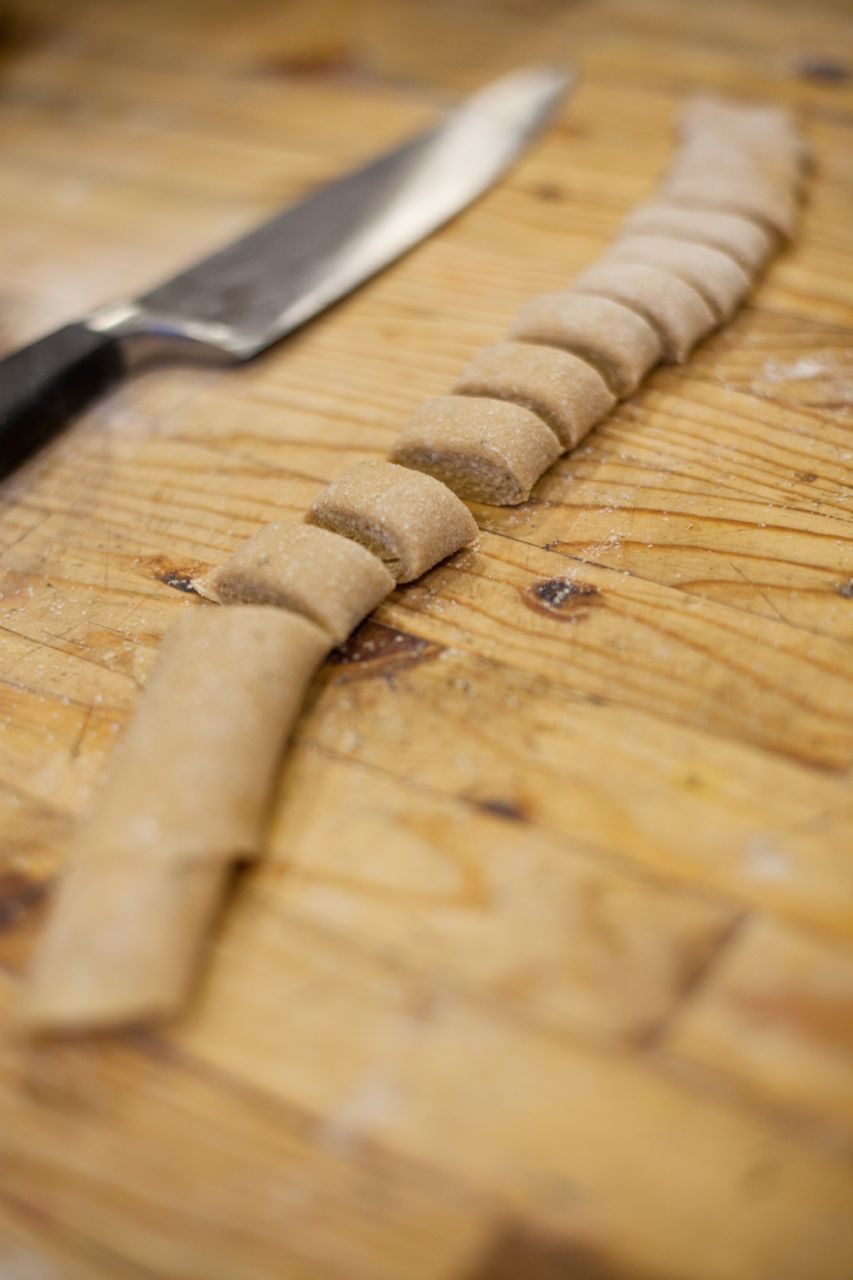
Carina showed me how to roll the dough into a seudo burrito to make cutting a breeze. We hung our pasta on a make-shift rack, and I prayed it would taste half-decent. We bundled the pappardelle into nests and froze half the dough. The other half we made into a scrumptious veggie-mushroom pasta, that was seriously DELICIOUS. We both scarfed it down. Later, my better half and I made a ridiculous goat ragu to top the wonderful fresh pasta, and I have to say, fresh pasta is seriously worth the afternoon activity and elbow grease. Being able to taste the pasta in perfect harmony with sauce, truly makes the difference in the dish. So don't be intimidated! Get in the kitchen, and get the disappointed grandma off your back and get your hands sticky! Buon Appetito!

Fresh Egg Herbes de Provence Pasta Dough

3 1/2 cup, sifted, unbleached all purpose flour (stone ground organic, if possible)

Add to well: 5 large eggs

1 teaspoon salt

1 teaspoon extra-virgin olive oil

1/2 cup minced Herbes de Provence 

Method

On a clean counter top or sheet of wax or parchment paper pour flour into a mound and shape into a well (sorta like how you make a well for gravy in your mashed potatoes). In well  combine eggs, salt, olive oil and herbes. Slowly whisk egg mixture, making sure to keep the walls of the well intact,l until blended, about 10 minutes. Knead dough until elastic and smooth, about 10-20 minutes. Divide dough into 4 pieces and wrap loosely with plastic and allow dough to rest for a minimum of 30 minutes.  

*You can also process the ingredients in a food processor for 15-20 seconds, method here.​

Roll out dough on lightly floured surface, gently stretching and pulling as you roll it into a thinner sheet, working with 1 quater of dough at a time. When pasta is about 1/8 inch thick. Flour both sides of the sheet and roll into a circle. Roll dough into 'burrito' and cut to desired thickness. I did about a 1/2 an inch for pappardelle. Unroll and hang on drying rack. Immediately cook or roll into bundles and freeze. ​

Recipe adapted from the Joy of Cooking

fork.jpg

Kale, Sweet Pea and Mushroom Pasta

1 onion, minced

3 cloves garlic, mined

1/2 cup sliced mushrooms

1 cup peas

1 bunch kale

Parmesan, to taste

salt & pepper, to taste

In a skillet, pan with oil. When oil is hot, add onions, cook for 2 minutes, or until golden. Add garlic and mushrooms, and sauté for 5 minutes. Add peas and cook for 2 minutes. Add kale, and cook till wilted. Serve atop fresh pasta. 

Caramelized Onion Goat Ragu ​

3 onions, minced

1 pound, goat meat, cubed

5 cloves garlic, minced

3 carrots, diced

2 stalks celery, diced ​

1 cup stock, veg or beef

2 tablespoons herbes de provence ​

1 teaspoon coriander

1 teaspoon mustard seed

1 teaspoon curry powder

salt & pepper, to taste

In a medium stock pot, ​cover pot with oil, and add onions. On high heat add goat cubes. Sear till brown. Add garlic, carrots, and celery, cook for 10 minutes. Add stock, seasonings and reduce heat to low. Simmer for 4-5 hours. Serve atop fresh pasta.  

Photos by Molto Carina

DIY: Pickles

picture.jpeg

Preserving food is one of my favorite facets of cooking. Not only is it a complex way to add acid or salt to a dish, but it also helps you save delicious or about-to-be spoiled vegetables. As a gardener, summer's abundance can be overwhelming, but pickling is one of the best ways to cut yourself a break, get into the kitchen, and preserve your bounty of fresh veggies. Pickling also allows you to enjoy your harvest months later, and in the late winter, is like opening a can of summer, a glimmer of hope of the next season. My better half, Greg, has been pickling since I first planted my garden, and I can take no credit for his simple and delicious pickles, as I am normally the one making jellies and jams. The combination has led to a harmonious collaboration in our pantry and led to many a yummy feast. Here Greg explains the effortless of pickling with some simple and easy-to-follow guidelines. 

We Can Pickle That!

BY GREGORY DIEHL Pickles are delicious. I don't know anyone who would dispute that, and I don't think I want to. If you don't like pickles, I HATE YOU. Now that I am done alienating people, lets get to it. Making your own pickles is cheap and easy and they are usually much better than those flaccid, electric green ones that seem to be the most widely available. Furthermore, understanding the process of pickling will allow you to make pickles out of many different types of food. 

Besides the great flavor it adds to foods, pickling is and always has been primarily a method of preservation. Last fall left Katie's plot at our local community garden littered with green tomatoes. We filled a shopping bag and brought them home, and the majority would have gone bad before we got around to eating them. Instead I pickled most of them, and we just opened a jar and enjoyed them earlier this winter.

There are two methods of pickling that involve two different types of brine, the liquid that preserves the vegetables. Pickling with a brine of salted water is a fermentation process that uses bacteria to create lactic acid, which then preserves and alters the flavor of the food. The other way to accomplish this is by using a brine of diluted vinegar, which is already acidic. Brining with salt is "true" pickling if you care about that sort of thing, and is also arguably tastier. Brining with vinegar, or "fresh" pickling is quicker and a bit easier, so that is a good place to start.

When you pickle in a vinegar-based brine it is best to dilute the vinegar with water, or else your pickles will be extremely sour. If your brine is too diluted though, the acidity will be insufficient to preserve the food and it won't last as long. Your pickles will also be less flavorful. As long as your brine is more than fifty percent vinegar, you should be in good shape, and it is best to stick pretty close to that ratio. I usually measure equal parts vinegar and water and then add a quick pour of vinegar to make sure I am over the fifty percent mark. You can use this ratio with any type of vinegar you please,  so long as it is between four and six percent acidity (most are). 

You should also add a couple tablespoons of salt for flavor, and if you have a sweet tooth feel free to add some sugar as well. To be sure that they completely dissolve in the brine, mix all of your brine ingredients in a saucepan and bring it to a boil. Any herbs, seasonings or aromatics such as onions or garlic can just be added to your jar with whatever you are pickling, and then you simply pour the hot brine in until it covers the food. Throwing a hot pepper or some flakes in the jar will make your pickles spicy. There are also many herbs and spices traditionally used for pickling, and pre-mixed pickling spices are widely available.

Pickles made in a vinegar brine will be ready in a week or so and stay good in the fridge for another 3-4 weeks. If you decide to can the pickles in a glass jar they will last for months without refrigeration, provided that you don't open the jar. I'm not gonna go into hot-water canning right now, but that may become a future post, or you can look it up here.

So there you have it- with these general guidelines you now have the power to pickle whatever the hell you want. Experiment with different types of vinegar, seasonings and vegetables, and figure out what you like. The other day I pickled carrots, and seasoned them with powdered cumin, some sliced ginger and a couple of cloves of garlic. Using the same brine, I also did some daikon with mustard seeds, a dash of sushi vinegar for the extra sweetness and a slice of poblano for some heat.

Most vegetables have a complimentary seasoning, check out our handy list as a reference:

http://infogr.am/SPICE-PAIRINGS-FOR-VEGETABLES/